Control a LED strip over Bluetooth with an Arduino
Victor Bonnelle • 25 February 2023
This is a rework of a tutorial I had published back then in July 2019.
Recently, I have been given a LED strip so I thought it could be convenient to make it possible to control it from my phone over Bluetooth. In this tutorial, I'll explain the process of doing so with an Arduino.
Requirements
- A LED strip to control
- An Arduino card with at least three PWM pins (the one with the ~)
- A bluetooth module (HC-05 or HC-06)
- A power supply (e.g. the one that comes with the LED strip)
I. Control the light strip
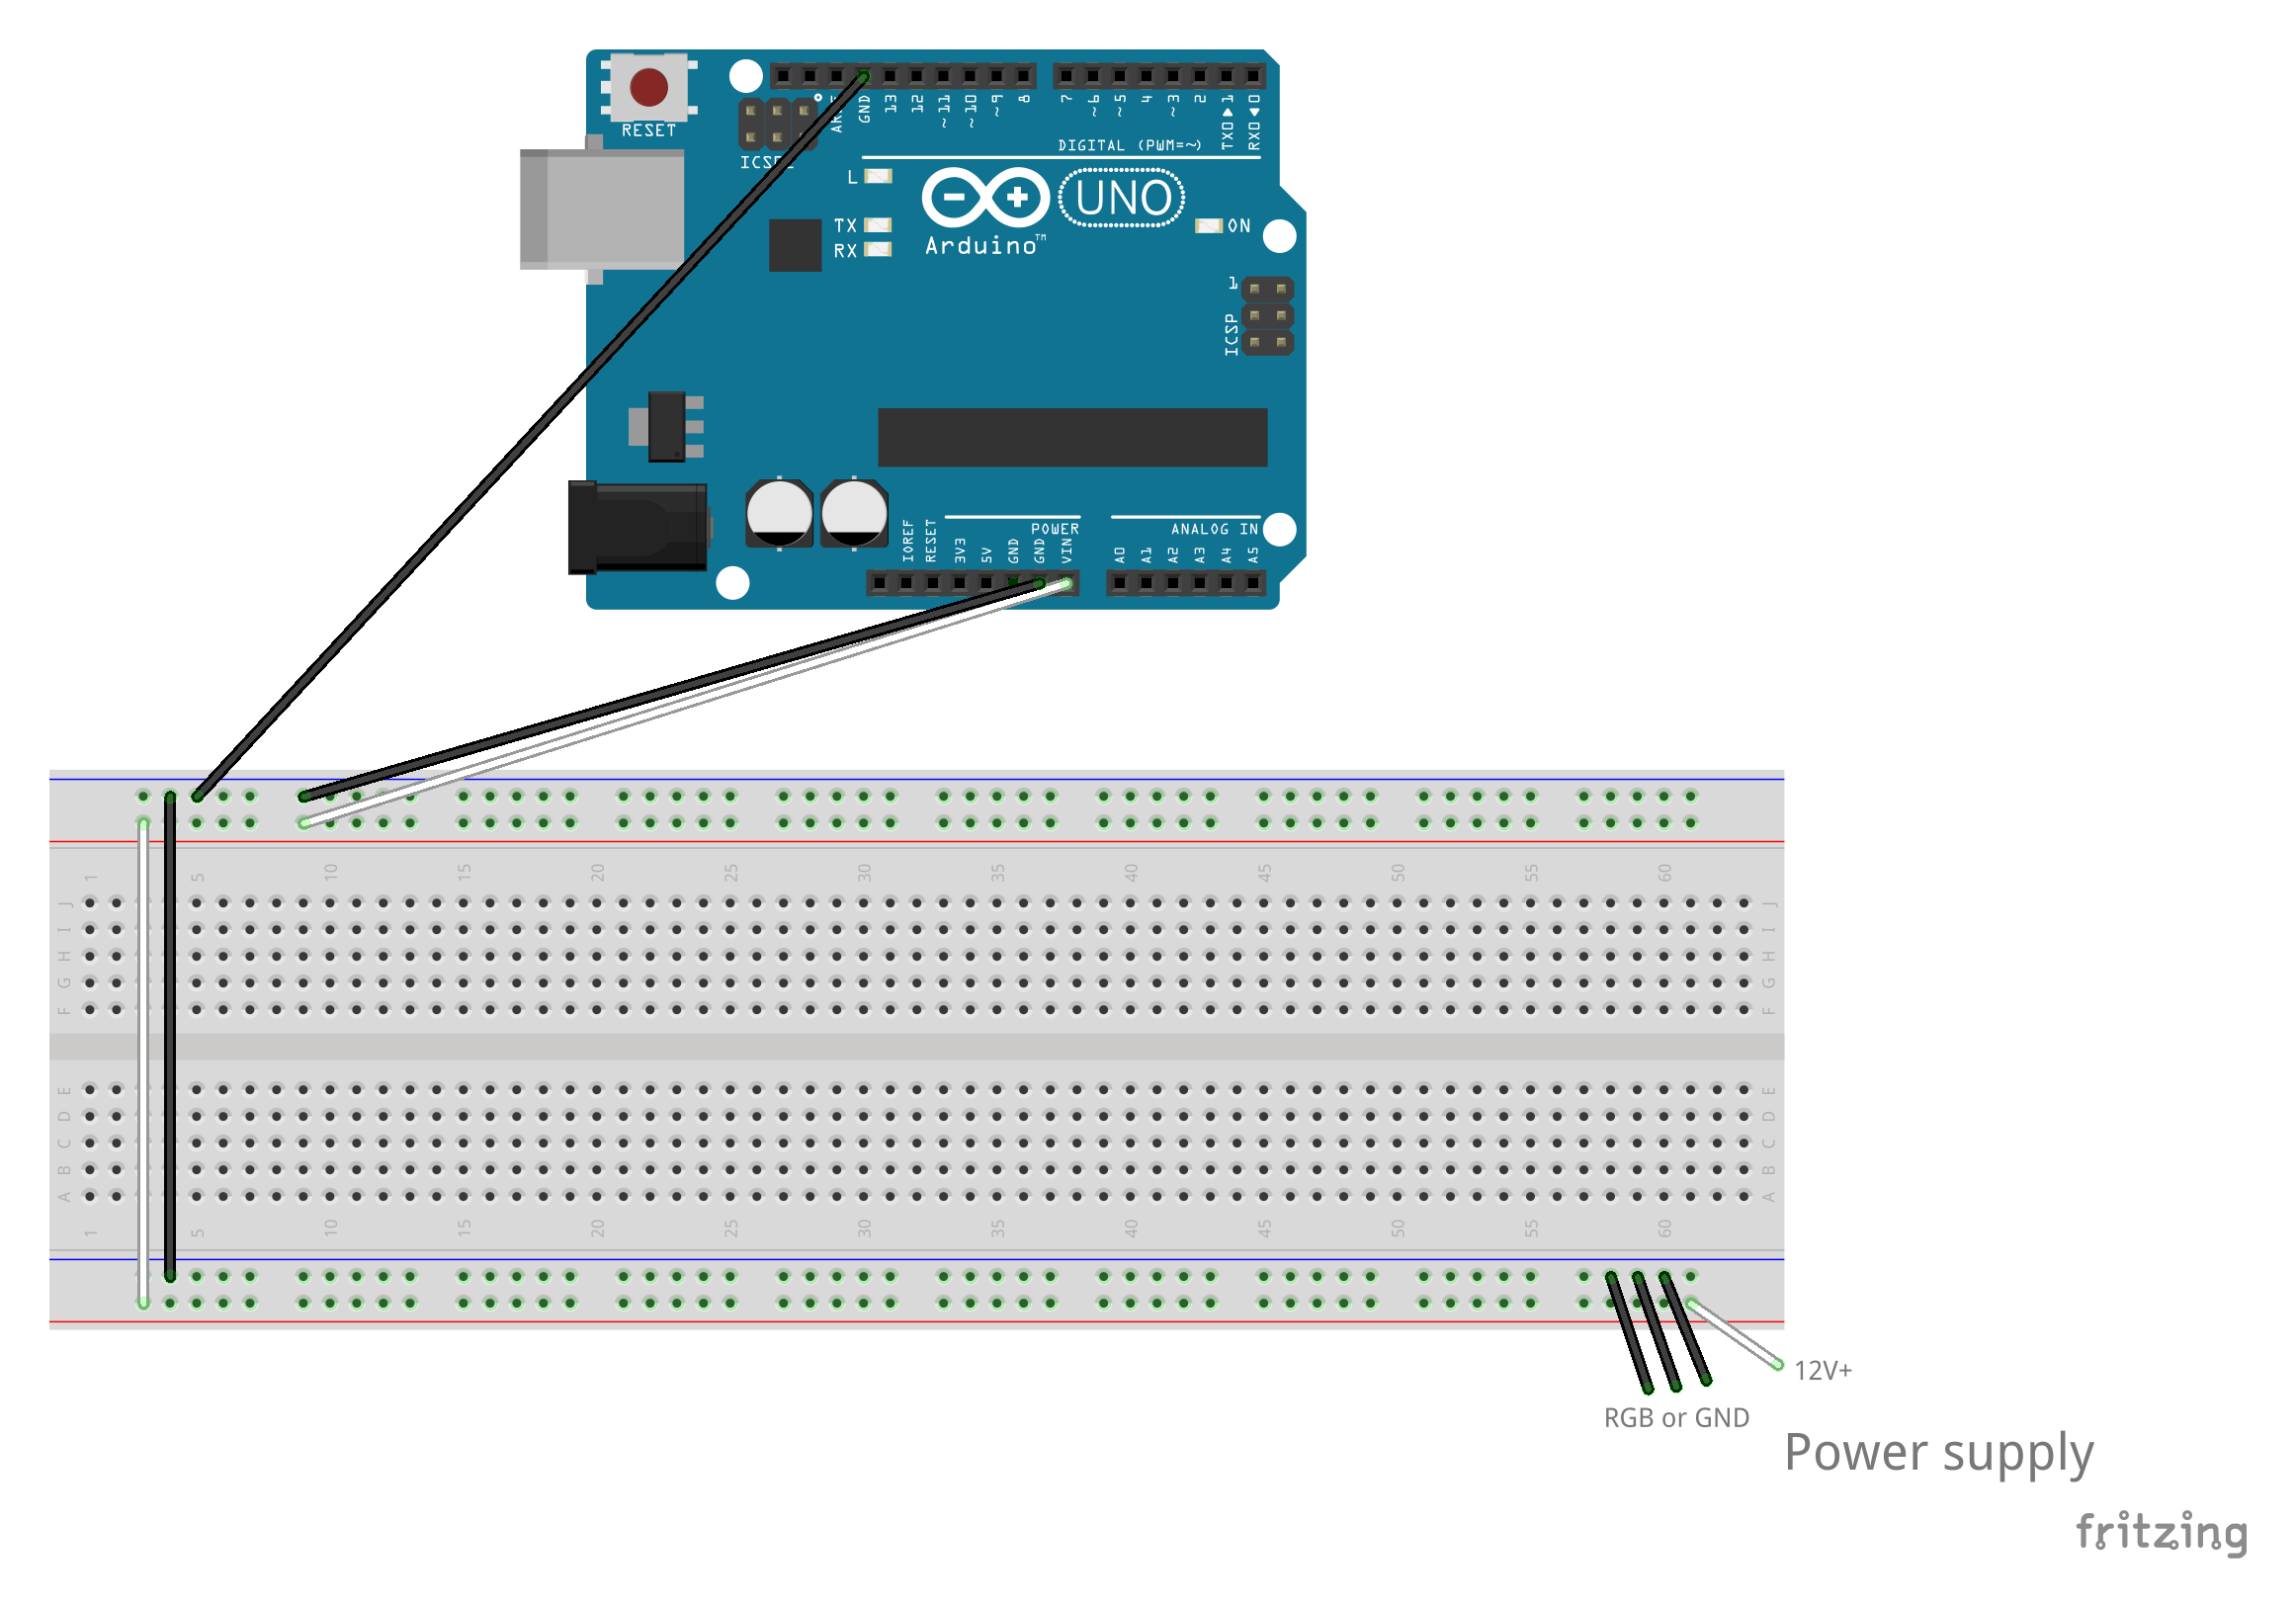
Step 1. Setup the power source
For starters, connect the + of the power supply and its ground to the breadboard (if the power supply doesn't have a ground, use the RGB pins). Then connect the power and the ground to the VIN and the GND pins of the Arduino.
Step 2. Get transistors
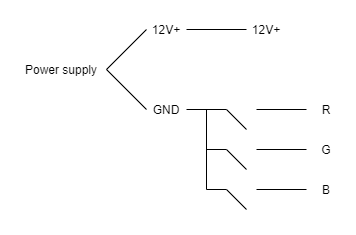
Of course we don't want all the colors to be on all the time, as it would only allow shades of gray. We want to be able to control them individually as follows:
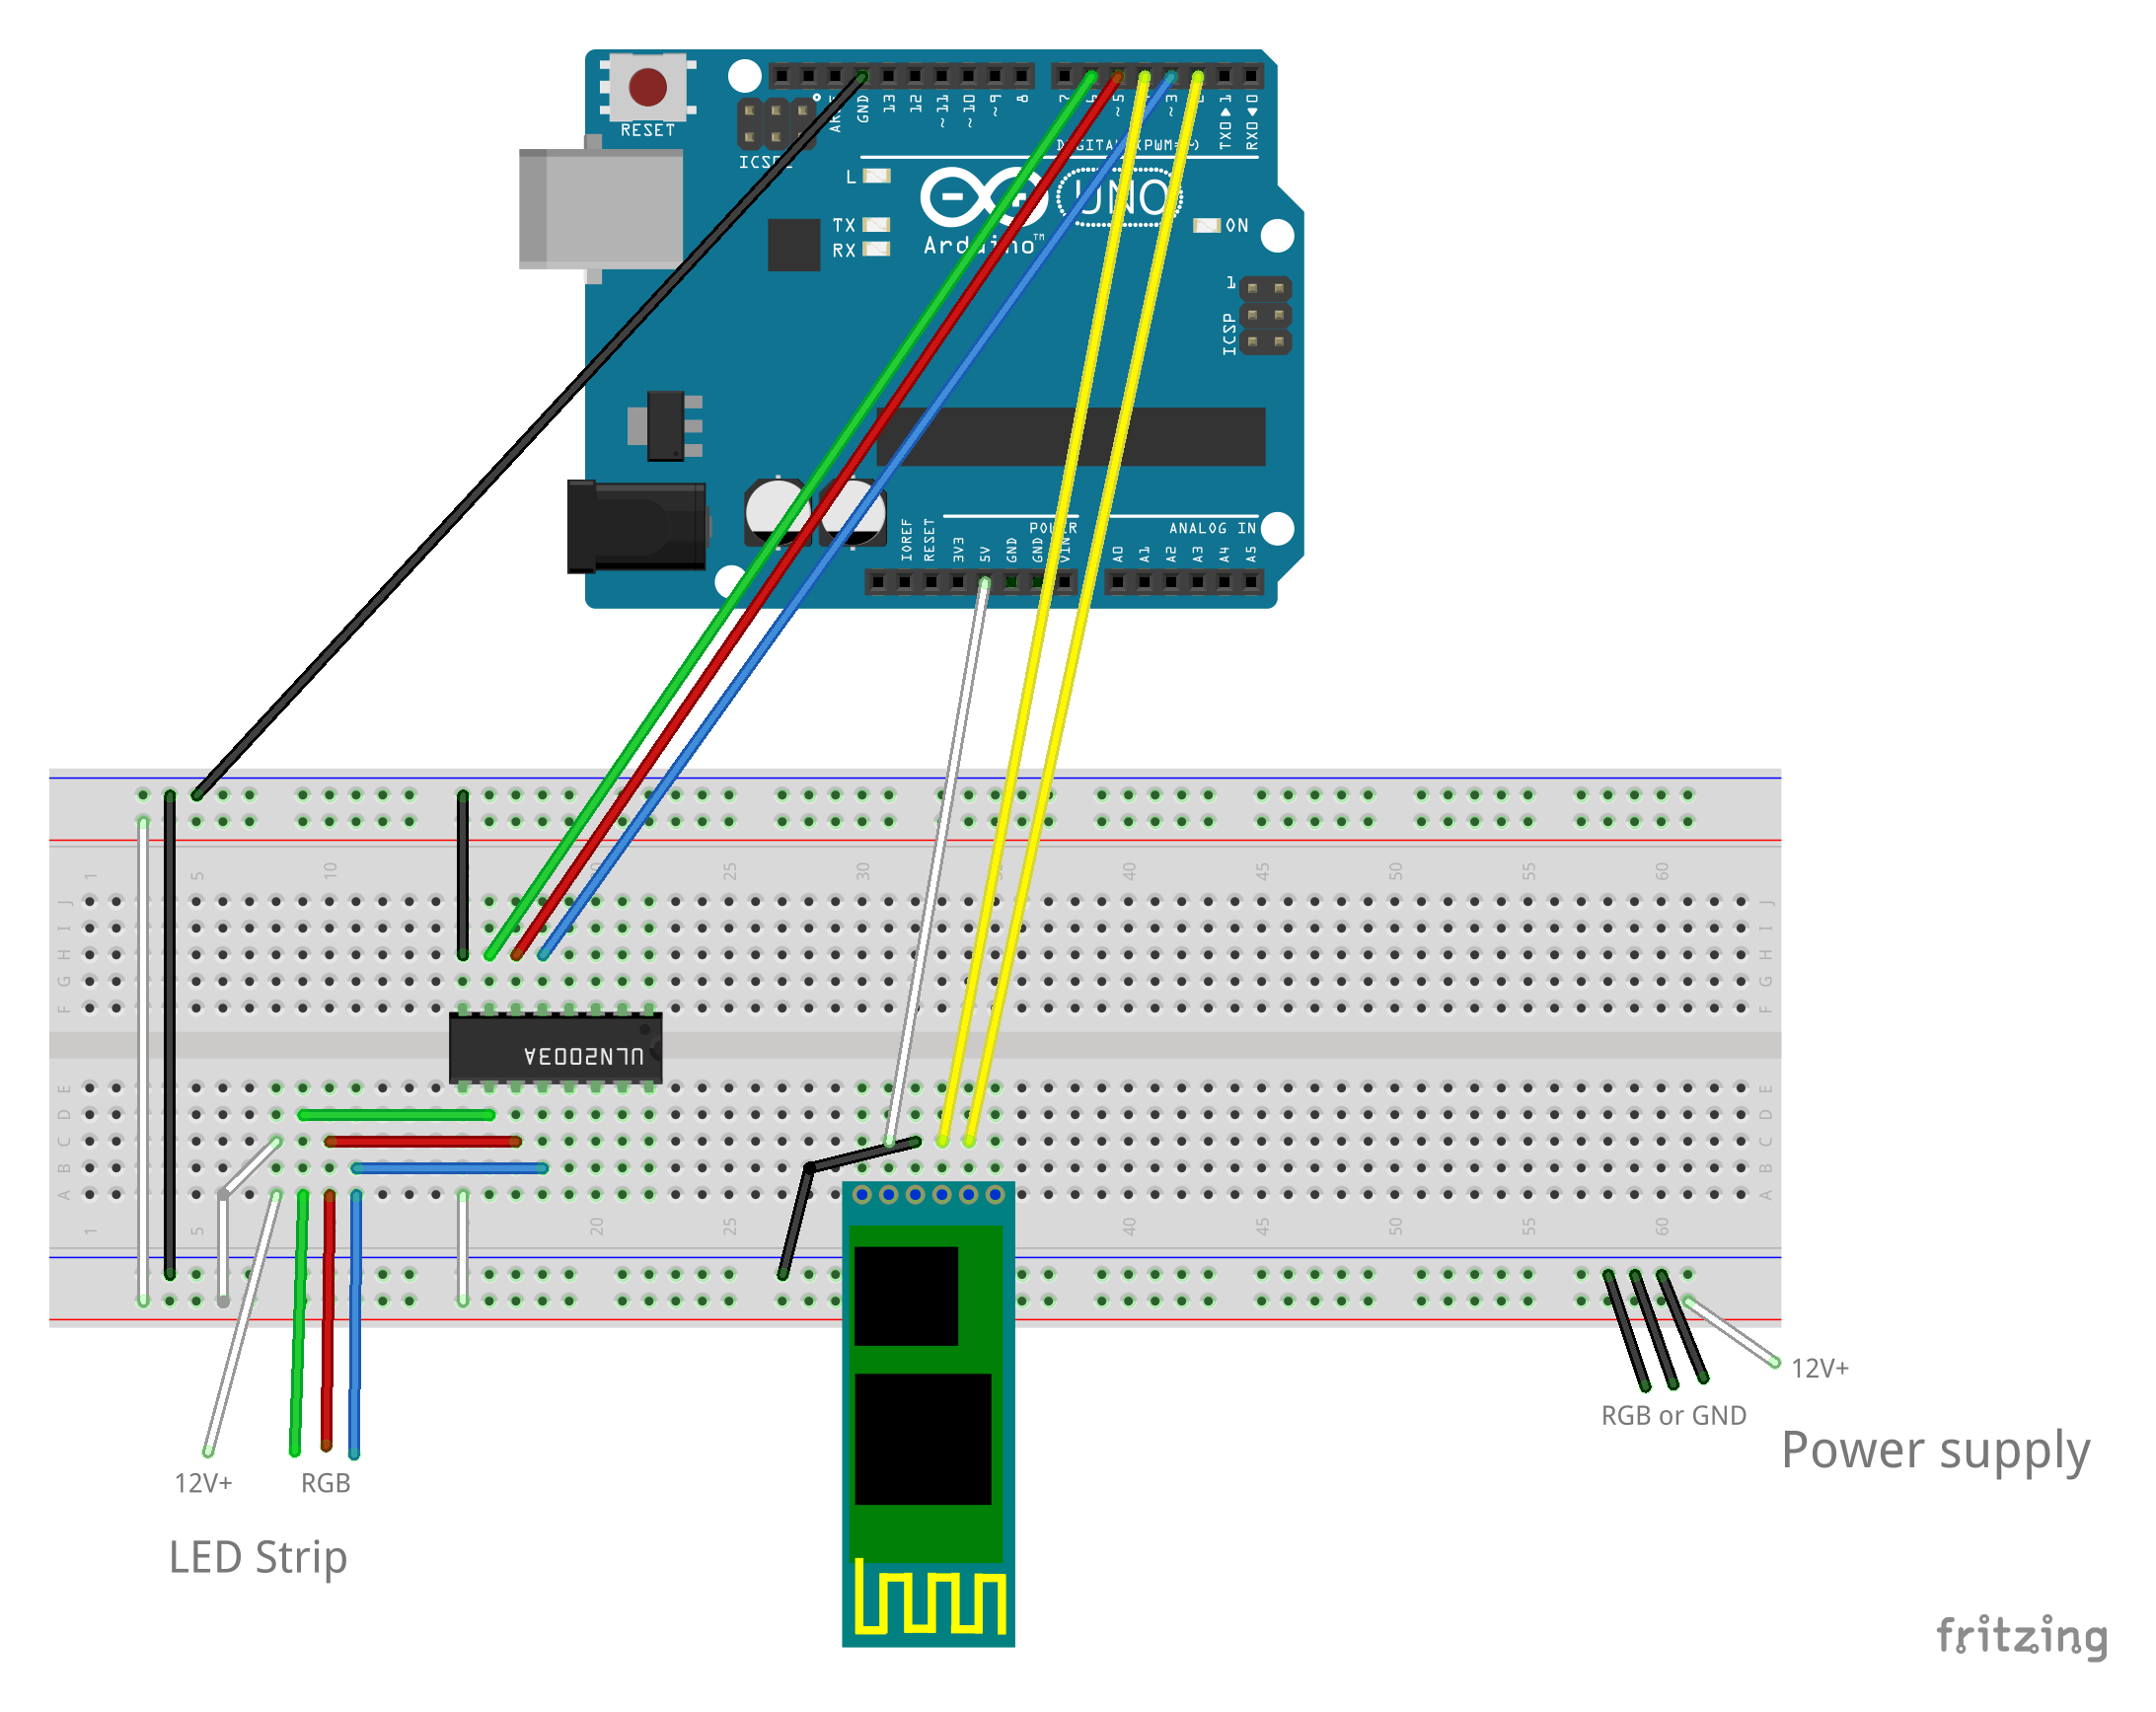
For sure, one could use switches, but here we want software control. Here comes the transistor! Two possiblities here: you can use either three transistors, or a transistor array. As I didn't have three of them, I used the array. If you don't have one either, there is often one on this component:
![]()
It's the black block which reads "ULN2003". You can remove it gently using your nails and a flathead screwdriver.
Step 3. Use the transistors to turn on the colors
Here is how a transistor array works:
![]()
Thus, you need to connect the power source and the ground, and then each color to a transistor and the corresponding control pin to a PWM pin of the Arduino.
![]()
Step 4. Start to code
Open your Arduino IDE, create a new file and first define your pins:
#define REDPIN 5
#define GREENPIN 6
#define BLUEPIN 3
Set them up as outputs:
void setup()
{
    pinMode(REDPIN, output);
    pinMode(GREENPIN, output);
    pinMode(BLUEPIN, output);
}
Try turning on the strip as red
void loop()
{
    digitalWrite(REDPIN, HIGH);
}
II. Bluetooth communication
Step 1. Get a bluetooth terminal
In order to communicate with the bluetooth module, you'll need an application. If you're using Android, check out this app.
Step 2. Connect the Bluetooth module to the Arduino
Make your connections as follows:
| HC-05 | Arduino |
|---|---|
| EN | N/A |
| VCC | 5V |
| GND | GND |
| TXD | Any pin (I use 4) |
| RXD | Any pin (I use 2) |
| STATE | N/A |
Note we don't care about the EN and STATE pins.
Step 3. Code
Bluetooth communication requires the use of the Software Serial library, import it:
#include <SoftwareSerial.h>
Define your TXD and RXD pins:
#define BTTXPIN 4
#define BTRXPIN 2
Get a serial object and initialise serial communication:
SoftwareSerial HC05(BTTXPIN, BTRXPIN);
void setup()
{
    HC05.begin(9600);
}
Step 4. Commands
For testing the communication, try this to just reply with the command that has been sent:
String cmd = "";
char c;

// Any unread messages?
while (HC05.available())
{
    // We mustn't go faster than the Bluetooth module!
    delay(1);
    // Read the message character by character
    c = HC05.read();
    cmd += c;
}

// Print the message in the Bluetooth Serial
// (it will be displayed on your phone)
HC05.println(cmd);
Now try to turn the red color on when recieving the "R" command
if (cmd == "B")
{
    digitalWrite(BLUEPIN, HIGH);
} else if (cmd == "b")
{
    digitalWrite(BLUEPIN, LOW);
}
III. Intensity
PWM are special pins on Arduino that can blink very quickly so that you can control the LEDs intensity.
Step 1. Set the frequency
Grab the function which sets the PWM frequency of a pin, which I honestly copy-paste from the website:
/*
 * http://www.arduino.cc/cgi-bin/yabb2/YaBB.pl?num=1235060559/0#4
 */
void setPwmFrequency(int pin, int divisor) {
   byte mode;
   if(pin == 5 || pin == 6 || pin == 9 || pin == 10) {
      switch(divisor) {
         case 1: mode = 0x01; break;
         case 8: mode = 0x02; break;
         case 64: mode = 0x03; break;
         case 256: mode = 0x04; break;
         case 1024: mode = 0x05; break;
         default: return;
      }
      if(pin == 5 || pin == 6) {
         TCCR0B = TCCR0B & 0b11111000 | mode;
      } else {
         TCCR1B = TCCR1B & 0b11111000 | mode;
      }
   } else if(pin == 3 || pin == 11) {
      switch(divisor) {
         case 1: mode = 0x01; break;
         case 8: mode = 0x02; break;
         case 32: mode = 0x03; break;
         case 64: mode = 0x04; break;
         case 128: mode = 0x05; break;
         case 256: mode = 0x06; break;
         case 1024: mode = 0x7; break;
         default: return;
      }
      TCCR2B = TCCR2B & 0b11111000 | mode;
   }
}
Then set a default frequency at start:
void setup()
{
    setPwmFrequency(REDPIN, 1);
    setPwmFrequency(GREENPIN, 1);
    setPwmFrequency(BLUEPIN, 1);
}
You can now set a frequency for each pin between the following values: 1, 8, 32, 64, 128, 256, 1024. Just take the lowest value with which it works (using 1 can cause issues with bluetooth).
Step 2. Turn on a color with a frequency
If you want to turn on a color with a specific frequency, use the function
analogWrite(pin, intensity) where pin is the pin and intensity a frequency
between 0 and 255 (the highest the brightest).
Try to make a specific color, e.g.
void loop()
{
    analogWrite(BLUEPIN, 30);
    analogWrite(REDPIN, 255);
    analogWrite(GREENPIN, 0);
}
Step 3. Make it variables
int red = 0;
int green = 0;
int blue = 0;

void updateColors()
{
    analogWrite(REDPIN, red);
    analogWrite(GREENPIN, green);
    analogWrite(BLUEPIN, blue);
}

void loop()
{
    updateColors();
}
Now you can just set the red, green and blue variables before the
updateColors(); in the loop to switch colors.
Step 4. Parsing commands
We now want to be able to set colors by sending color values: 255,255,255. The
parsing process consists of reading the string until a , is found, assigning
the found value to red, and repeat the process for green and blue.
void loop()
{
    bool hcAvail = HC05.available();
    if (hcAvail)
    {
        char *token;
        char value[3];
        String strval;

        token = strtok(input, ",");
        for (int i = 0; i < 3; i++) {
        value[i] = token[i];
        }
        strval = value;
        red = strval.toInt();

        token = strtok(NULL, ",");
        for (int i = 0; i < 3; i++) {
        value[i] = token[i];
        }
        strval = value;
        green = strval.toInt();

        token = strtok(NULL, ",");
        for (int i = 0; i < 3; i++) {
        value[i] = token[i];
        }
        strval = value;
        blue = strval.toInt();

        while (HC05.available())
        {
            hcAvail = HC05.available();
            delay(1);
            c = HC05.read();
            cmd += c;
        }
    }
}
Final word
Thank you for reading my tutorial. If you need help with it, do not hesitate sending me a message at victor.bonnelle@proton.me